Month: October 2016

Raid arrays on Debian

Raid arrays on Debian

I’ve been wondering for awhile now about how to configure my server when it comes to raid arrays. There’s all kinds of different configurations out there, raid levels 0,1,5, 10 or some combination of these seem to be most popular. There’s also software or hardware raid.


I’ve decided to take one of my servers and benchmark 2 different raid arrays on them.
After googling around and researching different raid configurations, I decided that either raid 5 or raid 10 would be my best bet. So these 2 setups would be benchmarked against each other to help me decide which one to use.
Since the server in use doesn’t have a hardware raid controller, software raid was the only real option. There was onboard hardware raid, but I think its just a fake raid anyway. (Bascially a software raid)
Since Linux’s mdadm tool provides very powerful raid configuration, I’ll be happy to just use it instead of the onboard software raid.


Background on Raid 5 and Raid 10


Raid 0:  Stripe of 2 or more disks
Raid 1:  Mirror of 2 or more disks
Raid 5:  Stripe of disks with parity for redundancy. Requires 3 or more disks.
Raid 10: Combination of 2 raid 1 arrays put together to make a final raid 0 array.


You can read up on more info about different raid configurations below.


Background on server


The server is mainly a web, email, proxy and file server. There will be lots of writes and reads hitting the disk. Server runs a network with about 60 workstations on it.
The server will be running Debian Sarge on a x86 architecture with a 2.6.16 kernel.


Contents of box:


Intel Pentium 4 3.6 Ghz (HT turned off)
Gigabyte 955x Royal Motherboard
2 Gig Memory
4 Sata WD 320 Gig Hard Drives


The motherboard in this box has 6 sata controllers, 4 from intel using an ich7 controller and 2 from silicon. I use the 2 silicon controllers to host backup hard disks, and run the main system on the 4 intel controllers.
Because of heat, and the design of the case, only 6 drives really work in this system. I supposed I could have purchased a sata card, (or a sata raid card) to get more drives, but for the ease of setup and budget, 6 drives was enough to setup the box.


Okay, so I have 4 disks to play with. I could use raid 5 or raid 10. But which one?
Well, raid 5 will give alot more disk space, about 75% of total disk space. Raid 10 however only gives 50% of total disk space. So right away, Raid 5 is winning without doing any bechmarks. However, with raid 5, if more than one disk fails at the same time, all data is lost. Raid 10 can handle multiple disk failures, but its not perfect. As long as the disks in the raid 1 arrays don’t fail at the same time, everything is okay. So raid 10 has a little better redundancy than raid 5, but less total storage.
Raid 5 also should have faster reads, and potentially faster writes than raid 10. Why? Because I’m building a raid 5 array from 4 disks. That should allow for 3 disks to stripe the data. The only penalty will come when the parity needs to read or written to.
The raid 10 is just a straight stipe or mirror and so no parity is used. This will give a huge advantage to raid 10. But wait, in my setup, I only have 4 disks, therefore only 2 disks (actually 2 mirrors) will be used for stripe. Although there is less disks, there will be no parity penalty, so this is why I want to test the raid 5 and raid 10 with some benchmarks.
I’m not only going to run simple benchmark programs and record the results. I’m going to run the bechmarks first just by themselves, and then again later while the system is under load.


Since this server will be performing normal tasks to run a network, I’m more interested in performance vs total space or redundancy. Although redundancy is still important, performance out of the raid array is really what I’m looking for.


One could also argue differences between build times or performance during a degraded array. This isn’t too much of a concern for me since I predict that the server won’t spend too much time of its life in a degraded state. (Remember, I’m running Debian, these boxes don’t like to be down wink
So again, I’m really only concerned about actual every day performance.


So, I have my server built and the system booted. Lets get to the benchmarks.
When I installed Sarge, I left some partitions free to create the raid arrays. I can use the tool mdadm to create any array I want from disk partitions.
I kept the partitions small so that build times wouldn’t take forever. The raid 5 array is created from 4 80 gig partitions. The raid 10 was created from the same 4 80 gig partitions. I started with raid 5, created the array, formatted it and mounted it.
After benchmarking the raid 5, I disasembled it and then went on to create the raid 10 array. I mounted it, and then performed the same tests.

The Tests

I ran 3 tests, each test with and without load.

Also, each individual test was run 3 times and I averaged the results.
The 3 tests were:


# bonnie -u root -f
# iozone -s 4020000 -t 1 -i 1 -i 0
# tiobench


I then performed the above tests again except with a stress program running in the background. The stress command was


# stress –cpu 8 –io 4 -d 2


The results


SW Raid 10 vs Raid 5 (Without Server Load)
All output is in MB/sec
[higher is better]

raid1

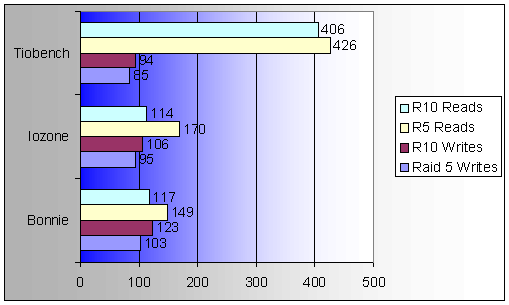
Note: I’m not sure why the tiobench read results are so high. Perhaps some of the results were being pulled from memory, and not from disk. Anyway, Raid 10 and Raid 5 showed similar results, so I’m just going with it.  laugh


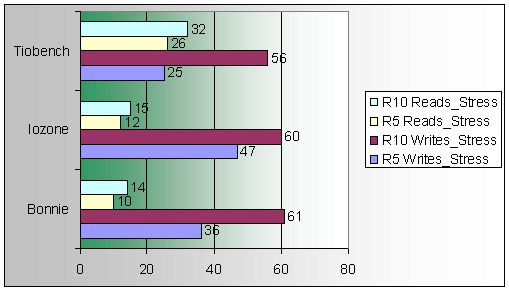
SW raid 10 vs Raid 5 (With Server Load)
[Higher is better]

raid2

Conclusion

Even though the raid 5 has higher reads without load in some cases, Raid 10 seems to have better writes and better overall performance during load.

It would be interesting to see the same tests but on a hardware raid as raid 5 wouldn’t have too much CPU time to calculate the parity.


Since disk space isn’t too important for me, I’ll be going with the raid 10. I like speed, and lots of it.
In the future, I’m also going to be looking at using XFS filesystems over EXT3. Apparently XFS has been around since the early 90’s but has just been ported to Linux since Kernel 2.4. It has the potential to be more robust holding netatalk files and may be a little quicker as well.
Configure your Optik Router ActionTec in Bridged Mode

Configure your Optik Router ActionTec in Bridged Mode

I have a unique situation. 🙂

I have Telus Optik TV with a PVR and a few other TV cable units. I also have a separate Telus Internet connection to my house. These two services are separate. Why? My Internet connection is a business connection which could not be bundled at the time with Optik TV. So I had to have two separate pipes activated in order to receive both services.

Here’s the problem. Optik TV requires an internet connection in order for some of the subtle Optik services to work properly. For example: The streaming music channels require internet access in order for the preview and album artwork to show properly on the screen. Also Optik apps such as Netflix and the weather network app require internet in order to stream movies or get weather information downloaded. None of the features worked because there was no internet access. My home computer network worked fine as it was on a physically separate ADSL connection.

How-to enable Optik TV with internet when internet is not bundled with the TV service.

The first trick is disable the Actiontec router’s firewall(nat) and configure the box for “bridged mode”. This isn’t easy since the menu option is hidden. You can enable this option by hacking the advanced configuration page while logged into the Actiontec modem.

Step 1: Login to your Actiontec router and go to the advanced setup page.

capture1

Step 2: Click on Wan IP Addressing. You’ll see an option to select an ISP protocol. The default might be RFC 1483 by DHCP. This is what normally works for Optik TV and internet, but this hides your TV units and internet access is blocked since I don’t have a valid connection via this network. The goal now is find the hidden radio button that allows the unit to be put into bridged mode.

Press F12 to activate your browsers developer mode and look for “rfc_1483_transparent_bridging” line. Change the value from display value from none to block.

You’ll now suddenly see a radio button option to enable transparent bridging. Select the radio button and apply the settings.

Step 3: Plug one of the LAN Ethernet connections on the Actiontec router into your own home network connection and reboot all your TV devices.

Done!

You will see that your TV units and PVR will still receive the TV channel feed from Optik, but your devices will receive an IP address from your home local network and they will have proper access to the internet.

References: http://npopson.com/archives/2202


Prevent spam with DNS

Prevent spam with DNS

I learned a neat antispam technique from a good colleague of mine on how to help stop spam email coming into your mail host. The goal is to trick spamming mail servers to hit a fake mail server, thus causing them to give up and not attempt a 2nd connection to your true mail server. The technique to accomplish this is to configure your MX records in DNS and rank your “true” mail server lower than your fake one.  devil

Here’s my example below using bind in Linux.

;
$TTL    1D
@       IN      SOA     ns1.estone.ca. hostmaster.estone.ca. (
2015032701      ; Serial
7200           ; Refresh
7200           ; Retry
2419200         ; Expire
10800 )        ; Negative Cache TTL
;
NS      ns1
NS      ns2
MX      10 mail1
MX      20 mail
;
;
estone.ca.      IN      TXT     “v=spf1 mx -all”
mail                            A       206.116.5.55
estone.ca.                      A       206.116.5.55
ns                              A       206.116.5.55
ns1                             A       206.116.5.55
ns2                             A       206.116.5.111
www                             A       206.116.5.55
comm                            A       206.116.5.55
mail1                           A       206.116.5.1
​Here is the result of a host command:

root@estone:~# host estone.ca
estone.ca has address 206.116.5.55
estone.ca mail is handled by 10 mail1.estone.ca.
estone.ca mail is handled by 20 mail.estone.ca.
root@estone:~#

Now hopefully when a spam engine mail server attempts to connect to my fake mail1 email server, it will of course fail(because their is no mail service on the mail1 host) and then hopefully give up.

Debian as Email Gateway

Debian as Email Gateway

My goal was to setup a Debian server that acts as an email gateway to my ‘real’ email server. The idea is that email comes into the gateway box, Exim processes the mail, and then routes the email onto the final destination server, and then mailbox. For this example, my main email system is called FirstClass(made by Opentext). It can run on Linux, Windows, or Mac. You wouldn’t normally provide a gateway email system for FirstClass, but because of Exim’s powerfull feature set, I wanted exim to intercept the mail, process it with RBLS, greylisting, and then pass it on to FirstClass. A similar example is where System Admins may buy a Barracuda box and place it in front of their Exchange server. This works well, but can empty your pockets.   🙂
Normally, I would have 2 servers.
  • The gateway server, running Debian, with Exim installed
  • The real mail server, running Debian with FirstClass installed
But in this case I wanted to run everything on one box. Hmmmm, sounds difficult at first. How the hell do you run 2 mail systems on one server? Well lets find out.
First, I have FirstClass installed on my server. But because I’m not going to use it receive or smtp email directly, I need to change the port that it runs on. There is a config setting for this:
Now that my main mail system is running on port 26, I can install and setup Exim on this same box which will run on the default port 25.

There is one more setting that is optional in FirstClass where I can specify where outgoing mail is sent. Either FirstClass can send email out directly, or I can pass it through Exim. I would like to pass it via Exim because then Exim will log all incoming and outgoing mail. So, I’ve set FirstClass to route mail through to Exim.
My domain is estone.ca
My mx record points to mail.estone.ca
Whats weird here is that I’m actually telling my FirstClass system to route its smtp mail to itself. But remember my main mail software is running on port 26. Since its routing all mail to mail.estone.ca (which is Exim running on port 25) then all is okay.

So now that I have my FirstClass system setup and running, its time to configure Exim to receive email and pass it on to FirstClass. What allows Exim to do this is called Mail Hubbing.
When you enable Exim to Mail Hub, it simply processes the mail but then passes it on to another mail host. Instead of Exim receiving the email, and sending it to a users mailbox[1], it routes it to another system.
[1] Linux would normally store its local mail in /var/mail/username
Below, is an example of how you could configure your Exim as a mail hub.(I’m using a split config in this example)
First, I’m assuming you’ve already configured your Exim to be a true mail server. Check the Exim FAQ for more info.
You can configure Exim on Debian by running:
# dpkg-reconfigure exim4-config
Create a file /etc/exim4/hubbed_hosts and enter the mail host you would like Exim to route the mail to.
Example:
root@estone:/etc/exim4# cat hubbed_hosts
estone.ca:                              199.60.230.17::26
root@estone:/etc/exim4#
Note that I use double colon to specify the port. If you have a 2nd physical server, you would have IP address only.
Now we’re almost done. There are a few more settings needed to make this work.
Another setting that is needed is to allow Exim to send to itself. This only needed because I’m running the 2 mail systems on one box. To allow Exim to send to itself add the “self = send” line to the router file.
root@estone:/etc/exim4# cat conf.d/router/150_exim4-config_hubbed_hosts
# router/150_exim4-config_hubbed_hosts
#################################
# route specific domains manually.
#
# see exim4-config_files(5) and spec.txt chapter 20.3 through 20.7 for
# more detailed documentation.
hubbed_hosts:
 debug_print = “R: hubbed_hosts for $domain”
 driver = manualroute
 self = send
 domains = “${if exists{CONFDIR/hubbed_hosts}\
                  {partial-lsearch;CONFDIR/hubbed_hosts}\
             fail}”
 same_domain_copy_routing = yes
 route_data = ${lookup{$domain}partial-lsearch{CONFDIR/hubbed_hosts}}
 transport = remote_smtp
root@estone:/etc/exim4#
And lastly, we need to adhere to RFC 3834 and not produce backscatter. If spam came into your Exim System, it would then hub it over to your main mail server. If the To: address had no real recipient, your main mail server will bounce a message back to the From: address of the spam. Thus, backscatter.
So, we need to configure exim to check for true recipients before it processes the mail.
This is done by adding recipient callouts to your check_rcpt config under /etc/exim4/conf.d/acl/30_exim4-config_check_rcpt.
[snip]
# We also require all accepted addresses to be verifiable. This check will
 # do local part verification for local domains, but only check the domain
 # for remote domains.
 require
   verify = recipient/callout
[snip]
 # Accept if the address is in a domain for which we are an incoming relay,
 # but again, only if the recipient can be verified.
 accept
   domains = +relay_to_domains
   endpass
   verify = recipient/callout
At this point, you are done.
Configure your Exim to check emails against Blacklists, and throw in some greylisting, or any other filtering/antivirus of your choice.
Cheers!